Dealing with your float line can make or break a dive. It just so happens that when you are having one of those frustrating dives, your float line will decide to play silly buggers and tangle around anything that it can. Learning to keep your line under control is the key to happy, stress free diving.
I am going to show you how to tie up or shorten your line, this will help you manage it when going through the surf and at other times when you don’t need to have it too long. Firstly though, there are a few other float line related tips I’d like to share that will help you keep everything under control.
Firstly, try not to use too much line, it is important to only use a floatline that is suited to the diving you are doing. For example, it is pointless to use a 20m or 30m line when diving on a point near the bricks. The waves will wash your float and fish onto the rocks and will probably result in you getting tangled up. This will end up with you clambering over the rocks to untangle your line while the waves do their best to roll you over the mussel beds and shred your suit like cheese on a grater. So when point diving, use a short line, as long as you need to get to the bottom. If you are diving in 5m of water use only 6 to 10m of line depending on the swell and conditions. If you only have one float line, don’t cut it, just shorten it using the technique shown later in this article.
I have also seen spearos make the opposite mistake and use a line that is too short. Guys often think that because they are diving in 15m of water, 15m of rope is all that is needed. This is not really practical as there is always some wind, swell or current which will necessitate a longer line. A good rule of thumb is to have about a third or more line than the depth you are diving. If you are in 10m of water, dive with 15m of line. If you are in 15m, use 20m of line… and in 20m, 30m of line…
A bungee is also a good addition to your gear. It will stretch out if there is any pressure on your line from current or swell while you are on the bottom. But don’t forget the main reason for using a bungee is to take the pressure off a fish when it takes off. I have overheard guys giving advice to put the bungee on the float side of the line. This is of little use when the fish takes off. Think of the bungee as the tip of a fishing rod bending under pressure to stop your line snapping, or in our case – the spear ripping out.
Another reason to have the bungee on the gun side is this: when you are swimming out, you don’t want the waves dragging your float back to the beach as your bungee stretches out. Wrap your bungee up around your gun and don’t let the waves pull it, otherwise you will be fighting against your bungee the whole time. Also make sure that your line is short when swimming through the surf. This way, when you dive down, the pressure on the float is down and the wave will roll over it. If your line is long you will be pulling the float through the surf for the extra length of your line.
Now, it is difficult to always have the right length of line for an entire dive and sometimes you need to temporarily make it short, like when you are going through the surf. What follows is an easy way to wind your line up and manage it well. Some guys like to have something that they wind the line on, but for me that’s just one more thing to drag around and tangle up.
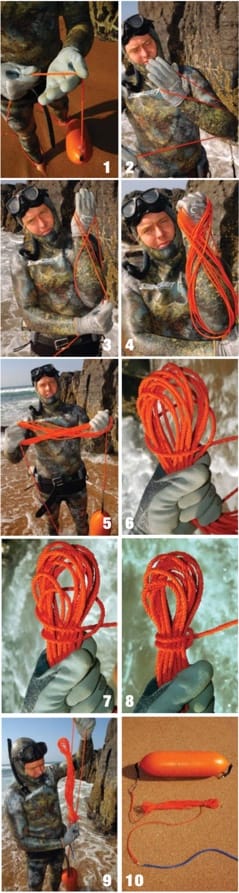
Step One:
Hold the line in your left hand (if you are right handed) The short end near either the gun or float must come out to your left, away from your hand (see fig. 1).
Notice that the line is being held halfway up the thumb and not at the base or webbing. This makes it easier to release the line once you have finished winding it up, especially when winding lengths of over 25m.
Step Two:
This step is the real trick here, as most guys just wind in one direction in a constant loop, which puts a twist into your line each time you go around. This means that when you come to let the line out, it tangles and gets in a knot. The way to avoid this is by winding in a figure of eight. What you need to do, is cross your forearm each time you go around your elbow and each time you go around your hand (see fig. 2 & 3). Each time you cross over, you twist the line in the opposite direction neutralising the twist, and when you let the line loose it will not tangle.
Step Three:
Once you have wound up the line (see fig. 4), take it off your arm, still holding the line from inside each loop to keep it neat (see fig. 5). Tip: leave half a metre each end unwound as you will need this to tie off.
Step Four:
To tie the looped line off, all you need to do is 2 half hitch knots (see fig. 6,7 & 8). Make the first half hitch and pull it tight, then do another one, again pulling it tight. Some guys put an extra twist in, I don’t as this makes it difficult to release when in a hurry.
If you have very stiff line that seems to slide, make a third half hitch and loop it behind the previous two half hitch knots. This will make it very strong.
Step Five:
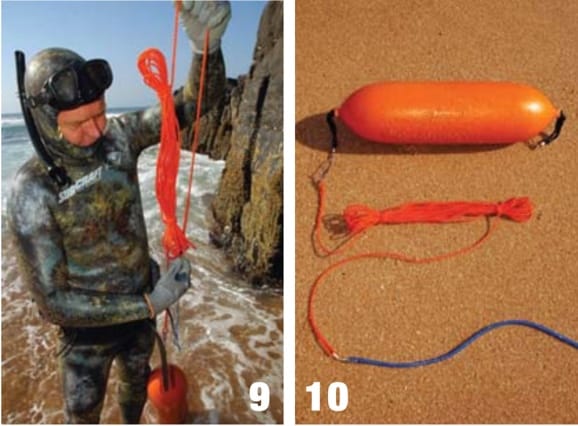
Repeat the process again on the other end remembering to tighten each knot (see fig. 9).
Using this technique, you will be able to shorten your line to whatever length you need. It holds well even through big surf and is quick and easy to undo when you need more line.
So, instead of reaching for the knife to shorten your line next time you are going to dive in the backline… just wind it up!
Happy hunting and tangle free diving.