A little while back we were having a discussion on the USM forum on the importance of correctly powered speargun rubbers, and the effects on accuracy and penetration etc. Then out of left field Corry chirps something along the lines that everything we had discussed was useless unless the spear was sharp. Not only did he have a good point, but it also got me thinking on a number of other aspects that dramatically affect accuracy, penetration and more.
The truth is that many guys seem to overlook their spears when it comes to their gear. I have had guys come into my workshop for gear maintenance on route to an expensive spearfishing trip, and pay for everything but fixing or replacing their spears. They end up paying thousands for a trip, only to leave everything to chance on an old blunt or even bent spear.
Your spear is probably the most important part of your gun, after all it is the part that is going to eventually hit the fish. You might not realise it, but there is a lot that goes into making a good spear, and over the years manufacturers have refined all aspects of the spear from the stiffness of materials to the sleekness of the barb. These weren’t changed or altered because it looked better, they are functional designs that make for a more accurate spear.
So when your spear is bent, blunt, or the barb is not working well, you are basically limiting your chances of success. Let me ask you this, “is it more effort to go diving or fix your spear?” The answer is most definitely go diving. Getting out there takes effort and time, so don’t waste it on badly maintained equipment.
Sharp Points
Back to our discussion with Corry, how that came about, was that he was saying he was getting the same results we were, but with way less power. There is always a tendancy to go the ol’ American ‘brute force and ignorance’ route and have a bigger and stronger gun. Corry argued and proved that by simply having very sharp spears you can get the same results and possibly better because you don’t have accuracy issues associated with over powering.
Sharpening a spear can be a bit of a job, if not an art. The big manufacturers have fancy jigs and machines that accurately and effectively sharpen your spear. Unfortunately it is not always practical to run to your nearest manufacturer for a quick spear sharpen every time you need it. I have also seen some spears that have had a scary home sharpening job done on them. Most guys find a grinder and merrily just grind away, but they usually just end up doing more damage. They either wreck the angle of the tri-cut point or make a cylindrical point. Keep in mind that the point is what will determine the spear’s flight path and essentially ensures that it flies true. In other words, if the sides of the tri-cut are not equal, and the point centered on the spear shaft, the unequal sides will act like a rudder and steer the spear off its intended path.
It has been proven that a good tri-cut tip has a far more efficient penetration than a cylindrical or conical tip. So, when it comes to sharpening a spear, you need to keep the integrity of the tri-cut. I have found that using a grinder does not work as it eats away at the spear too fast and you have no control. It also often ends up heating and in turn weakening the spear tip.
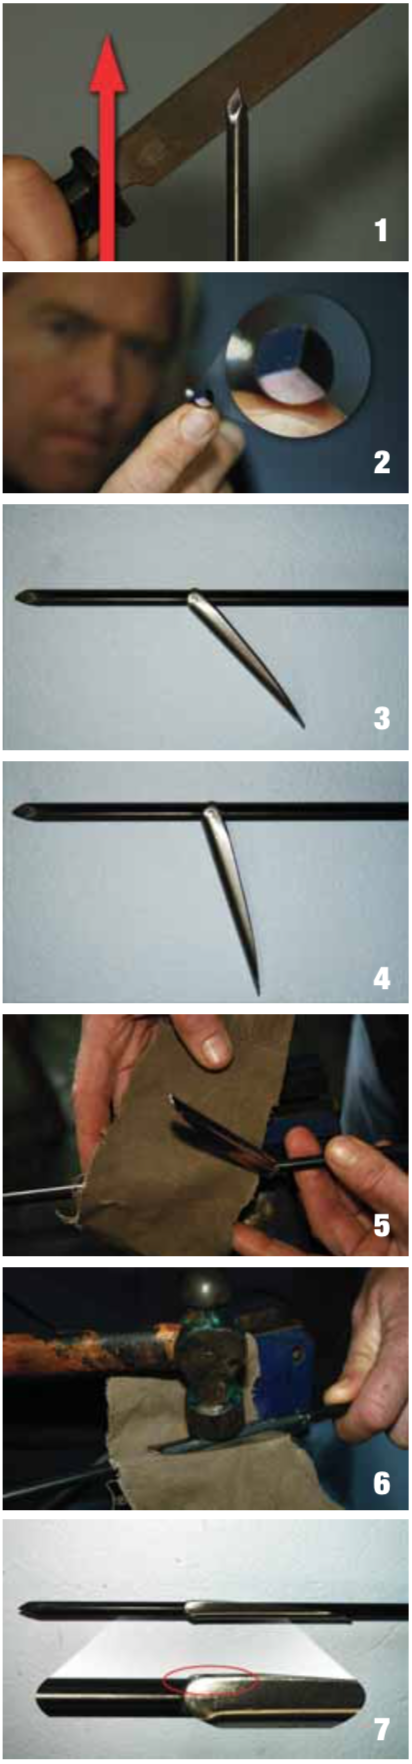
The solution is to use a flat file as you have precise control over what you are doing. The best file to use is a ‘2nd Cut’ file (referring to the coarseness of the cutting teeth). You can either put the spear in a vice and sit facing the spear or stand holding the spear vertically in one hand with the spear point near eye level. See Fig 1.
The trick here is to file the flat edges of each tri-cut at exactly the same angle. Filing up and away from the spear point, file each face 3 to 5 times before moving to the next one. If you have been careful to keep the file at the same angle on all 3 faces, you will start to get a nice sharp point. After every couple rotations, look directly down the spear at the tri-cut. You should see a perfectly divided circle like a pie, with the point in the center. See Fig 2.
If you are like Corry you can finish off the process with a good wetting stone, making your spear super sharp. The best thing about a file is that you can just pop it into your dive bag and take it with you on a trip.
Bad Barbs
Another area often overlooked is the importance of the condition and functionality of your barb. After all, it’s the barb that’s holding your fish on the spear. Two things can affect your barb: firstly just good old wear and tear, secondly, rust and negligence. Either way, you want your barb working properly and opening up once it’s gone through a fish.
Check that your barb is opening properly by holding the spear out horizontally and letting the barb fall. The barb should be loose and fall to about 30 to 50 degrees from the spear. See Fig 3. With a little force, the barb should open up almost 90 degrees to the spear and stay there. This so that the barb does not flop closed and the spear pulls back through the fish resulting in you dropping’ the fish. See Fig 4.
Should the barb not drop freely, try manually freeing it by loosening it with your hand. Sometimes corrosion will jam it up a little and all it needs is a clean and movement to free it up. If this doesn’t work or if you know that the barb has been bent or is too tight you will need to loosen it. To loosen a barb you will need a piece of thick cloth. A piece of coarse canvass or denim normally works best. Lie the cloth under the barb and gently hammer the barb closed. See Fig 5 & 6. This should start to loosen the barb, you might need to repeat the process and even double over the cloth to get the desired result.
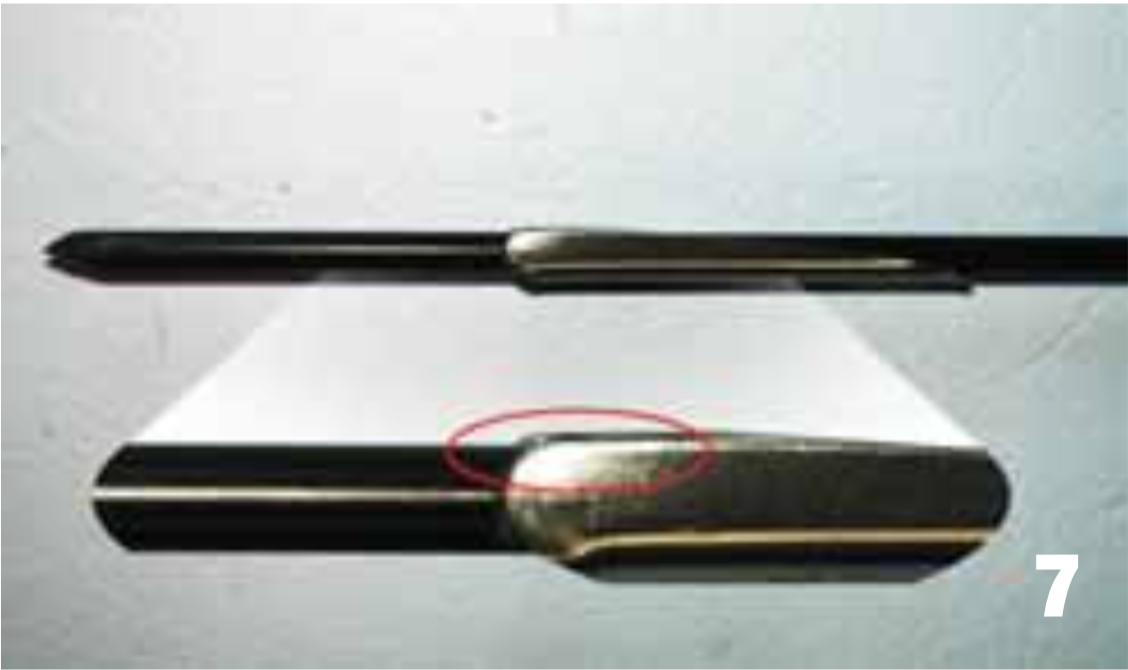
Sometimes this process will free the barb up to the point where it no longer tightens at 30 to 50 degrees (Fig 4) and opens up all the way, or maybe your barb is just loose from wear and tear. You will now need to tighten it slightly. This is a tricky process and you have to be careful or you could end up jamming the barb permanently closed again. With the barb closed, use a small hammer to gently knock the area directly above the pin that holds the barb on the spear. See Fig 7. Tap each side of the barb until the barb only opens up freely to about 30 to 50 degrees.
All this is easier said than done, so I suggest you get some old spears and practice a few times. Rather ruin an old spear than try attempt this for the first time when out in the sticks on a remote spearfishing trip.
Spear Tips
Invest in silcon spray to coat your spears when not in use. Silicon washes off easily and won’t get gooey and sticky like oil based sprays such as Q20. Never sand your spear down (even to get rid of rust patches). All you will end up doing is removing whatever rust resistant coating is left on the spear. If your spear is in bad shape, rather use Brasso and polish it. This too will remove some of the coating, but not nearly as much as sand paper would. Be sure to spray or wipe the spear down with silicon after doing this.